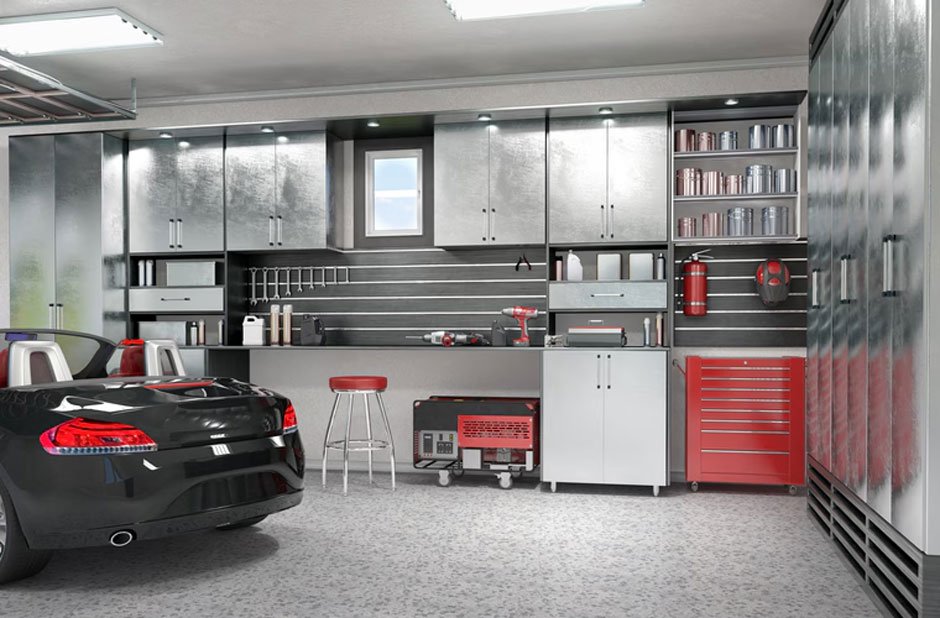
 Are you a DIY enthusiast with a passion for creativity but no dedicated space to bring your ideas to life? It might be time to look closer to home—or rather, your garage! That forgotten space full of boxes, old sports equipment and who-knows-what else could become the craft workshop of your dreams, notes the team at Legacy Realty & Management Services.
Transforming your garage into a functional, inspiring workshop is easier than it sounds. With a little planning and creativity, you’ll soon have a space where inspiration thrives. Let’s walk you through how to organise your garage, explore clever storage ideas, and plan essential upgrades to make your dream craft workshop a reality.
Step 1: Declutter Like a Pro
Before you can create your ideal workspace, you’ve got to clear the clutter. Sort through everything in the garage using a simple three-pile system: keep, donate, and toss. Be ruthless here—does that old treadmill really need to stay?
Once you’ve decluttered, clean thoroughly. Yes, that means sweeping out cobwebs, hosing down the floor and wiping down surfaces. You’ll be surprised how good it feels to start with a blank slate.
Step 2: Get Clever with Storage
A craft workshop calls for excellent organisation. Once your garage is clutter-free, maximise your space with clever garage storage solutions. Here’s how to make your tools and supplies easily accessible without taking over the room:
Wall Storage
Don’t waste walls! Pegboards are a crafter’s best friend. Pegboards allow you to hang tools like scissors, paintbrushes, screwdrivers, and more where they’re visible and ready to grab. Add hooks, baskets, or magnetic strips for even more options.
Shelving Solutions
Install wall-mounted shelves to make the most of vertical space. Put less-used items on the higher shelves (think seasonal decor or that box of faux flowers for spring wreath-making). Use clear labelled bins to group and store smaller items like beads, buttons, or thread.
Rolling Carts
A rolling craft cart is ingenious. Need paints at one end of the room and stamps at the other? Roll the cart to where you’re working. Plus, when you’re done, simply wheel it neatly out of sight into a corner.
Drawer Systems
For smaller bits and bobs, drawer units are essential. Opt for models with clear pull-out drawers so you can see what’s inside without rummaging. Perfect for things like ribbons, sewing patterns or glues.
Step 3: Update the Flooring
Garage floors are often cold, dirty concrete—hardly the ideal surface for a creative space. Upgrade your garage flooring for comfort and practicality. Options include:
- Foam Mats: Soft, cheap and easy to install, they’re an excellent option if you’re spending long hours standing.
- Epoxy Coating: This smooth surface is easy to clean (goodbye glue spills!) and adds a sleek, professional look to your garage.
- Rubber Flooring: Durable yet soft underfoot, perfect if heavy equipment like sewing machines or saws are part of your craft.
Step 4: Improve the Lighting
Natural light is every crafter’s best friend, but garages aren’t usually known for their bright sunny vibes. If you don’t have much natural light coming in, invest in proper lighting.
Overhead Lights
Replace any dim, outdated bulbs with bright LED fixtures. LEDs are energy-efficient and mimic natural daylight, making it easier for you to see those intricate details.
Task Lighting
Position adjustable task lamps or clip-on lights at your workstation to illuminate your projects. Working on small, precise crafts? A magnifying lamp is a game-changer.
Tip: Incorporate accent lighting like string lights or small lamps to give your workshop a cosy, inviting feel.
Step 5: Create Dedicated Work Zones
Whether you’re into sewing, painting, jewellery making, or woodwork, set up specific zones for each activity. This way, each craft has a home, and you can switch tasks effortlessly without disruptions.
- Workbench/Desk: Create a solid workstation. A sturdy table is a must for sewing machines, wood projects or any craft that requires elbow room.
- Supplies Zone: Keep your tools and materials close to where you need them. Group by activity for easy access.
- Cutting Station: If you’re into textiles or paper crafts, a dedicated space with a cutting mat will save your dining table from getting hijacked.
Step 6: Personalise Your Space
Finally, this is your creative haven—why not make it beautiful? Adding touches of your personality will inspire you to spend more time there.
- Decorate the Walls: Put up inspiring artwork, photos, or even your favourite motivational quotes to encourage that creative mindset.
- Colour Code It: Coordinate your storage bins, shelves, and wall paint to match your style, whether rustic, minimalist, or vibrant.
- Music and Comfort: Consider adding a small speaker for your tunes and a comfy chair or stool for when you need a break.
Step 7: Don’t Forget Ventilation
Crafting can involve fumes from glue, paint, or varnish. Make sure your workshop is well-ventilated. Open windows or install a small exhaust fan to keep the air fresh so you can work comfortably for hours.
Craft Your Dream Workshop Today!
Transforming your garage into a craft workshop is more than just an upgrade—it’s about creating a dedicated space where creativity can flourish. With clever storage ideas, a few upgrades, and a sprinkle of personal style, your garage can become the ultimate DIY haven.
If this guide has inspired you, go ahead and take that first step—clear out that clutter and imagine the possibilities! Not only will your garage breathe new life, but you’ll also finally have that perfect space to bring your creative visions to life.


Leave a Reply