Tired of patchy, brown grass that ruins your yard? Laying fresh sod gives instant green, and it roots fast with proper care. This guide walks you step by step, from soil tests to watering.
Read on.
Prepare the Site
Getting your yard ready takes a little work but makes all the difference—think clean, level, and healthy soil. Good preparation here can help the grass roots grow strong, give better drainage, and set you up for a nicer-looking lawn.
Remove existing grass and weeds
Clear the old lawn first. Remove weeds and dead grass.
- Use a sod cutter or shovel to cut sod into strips, lift the turf, and roll it up for removal; this speeds turf installation and limits root regrowth.
- Pull weeds by hand in small spots, grab the whole root, and drop plants into a bag for disposal; this helps with lawn care and stops weeds from spreading.
- Spray a nonselective herbicide on large, stubborn patches, follow label directions, and wait the recommended time before digging; this reduces regrowth risk.
- Till the soil to a depth of six inches where grass is thin, mix in compost or topsoil, and break up clumps; this improves soil preparation and drainage.
- Rake the area smooth, remove stones and debris, and level high spots; this step aids ground grading for future turf installation.
- Compact the surface lightly with a plate compactor or hand tamper, check slopes for proper drainage, and correct low spots; this prevents settling after sod goes down.
- Haul away old sod or lay it in a compost pile, avoid leaving thick layers on the soil, and do not bury large clumps; this keeps the landscaping area clean and prevents pests.
If you’re looking for expert help, consider contacting a local company that specializes in sodding installation Ottawa.
Test and amend the soil
Testing and amending the soil is key for a healthy lawn. Good soil helps grass grow strong.
- Get a soil test kit. Many garden stores sell these kits. They help you know what your soil needs.
- Collect samples from different spots. Take small amounts of soil from various areas of your lawn. Mix them in one container to get a good average.
- Follow the kit instructions carefully. Each kit has steps to show you how to test pH and nutrient levels. This tells you if your soil is too acidic or too basic.
- Check for nutrients like nitrogen, phosphorous, and potassium. These are vital for grass growth and keep your lawn green and lush.
- Amend the soil based on results. You might need to add things like lime to raise pH or sulfur to lower it. Fertilizers can also boost nutrients, making your lawn healthier. If you prefer to skip the do-it-yourself work, a professional lawn fertilizer service can handle this step for you, ensuring the right nutrients are applied at the right time.
- Improve drainage if needed. If water sits on top of the ground, it can hurt grass roots. Adding organic matter like compost can help with drainage.
- Mix amendments well into the top layer of soil. Use a rake or shovel to blend everything together evenly before you lay down sod.
Testing and amending your soil sets up a great foundation for turf installation later on!
Grade and compact the surface
Grading and compacting the surface is a key step for your new sod. This process ensures that the soil is level and sturdy.
- Start by leveling the area. Use a rake to spread the soil evenly. Aim for a smooth surface with no bumps or dips.
- Fill in any holes or low spots. Add topsoil where needed. This will help create a flat base for the sod.
- Compact the soil to make it firm. Use a roller or simply walk on it gently. Firm soil helps prevent settling after you lay the sod.
- Check for drainage while grading. Water should flow away from structures, not toward them. Proper drainage keeps your lawn healthy and prevents puddles.
- Ensure there are no large rocks or debris left on the surface. Clear everything away so your new sod has room to grow.
Now that you have prepared a solid base, it’s time to choose the right sod for your climate.
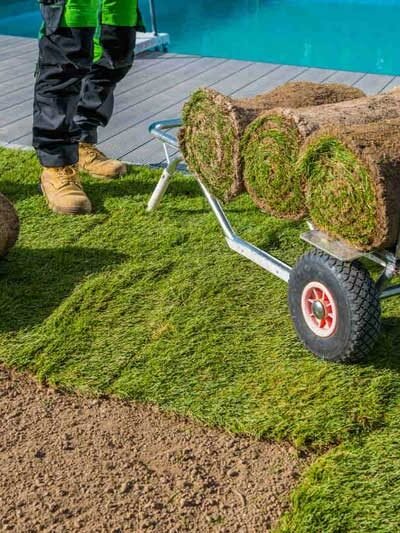
Laying the Sod
Laying the sod is a key step in creating your new lawn. Choose grass that suits your area and lay the pieces in a staggered pattern for a strong look.
Choose the right sod for your climate
Choosing the right sod is key to a healthy lawn. Different grass types thrive in different climates. Cool-season grasses grow well in northern areas, while warm-season varieties are best for southern places. Research local conditions, like temperature and rainfall.
Ask your garden center for advice on the best sod options for your region. Look at how much sunlight or shade your yard gets; this affects which grass will grow strong. Once you have the right sod picked out, you can move on to laying it down properly for a beautiful lawn.
Lay sod in a staggered pattern
After selecting the right sod for your climate, it’s time to lay it down. Laying sod in a staggered pattern helps create a strong lawn.
- Start laying the first row along a straight edge. This gives you a good starting point.
- Press the edges of each piece together tightly. Make sure there are no gaps between them.
- Stagger the next row using half of a piece of sod at the start. This helps to avoid long seams, which can weaken your lawn.
- Repeat this pattern across the entire area. Each new row should start with a different section of sod to maintain that staggered look.
- Trim any edges that do not fit perfectly using a sharp knife or spade. A clean edge will help the new grass grow better.
- Check for any low spots once all pieces are laid down; fill these holes with soil if needed.
This method is key in turf installation and ensures even growth across your lawn.
Trim edges to fit the area
Trimming edges is key for a neat lawn. This small action can make a big difference in your landscaping.
- Use a sharp garden knife or scissors to cut away any extra sod. This will help the sod lay flat and look clean.
- Follow the shape of your lawn as you trim. Curvy edges should match the natural outlines of your yard.
- Make sure to cut just enough so that the sod fits well. Avoid cutting too much, or it could pull away from the soil.
- Check if the edges are level with the surrounding soil after trimming. This will help with drainage and give a polished look.
- Clean up any clippings or scraps left on the lawn. Keeping the area tidy helps prevent pests and diseases later on.
Watering and Maintenance
Water your new sod right after you lay it down. Keep a steady watering plan for the next few weeks. Stay off the grass for two weeks to help it settle in well—curious about more tips?
Water immediately after installation
Watering your new sod right after you lay it is very important. This helps the roots settle and start growing.
- Soak the sod with water right after installation. This ensures the grass gets moisture for a good start.
- Aim for about 1 to 2 inches of water. That’s enough to wet the soil beneath the sod.
- Use a sprinkler or hose to apply water evenly. Make sure all pieces of sod are covered.
- Avoid puddles or standing water on the surface. Too much water can harm the grass.
- Check the sod by lifting a corner. If it feels dry, add more water until it’s moist.
- Water again within a few hours if needed. Some areas may dry out faster than others, so keep an eye on them.
Establish a regular watering schedule
After you water immediately after installation, it’s time to set up a regular watering schedule. Fresh sod needs plenty of water at first. Aim for about one inch of water per week. This includes rainwater and any additional watering you do.
Watering every few days is best for new grass. During hot weather, check the soil often. If it feels dry an inch down, give it a drink. Avoid letting the ground dry out too much; this can stress your grass and slow its growth. Keeping a consistent schedule will help your lawn thrive and look great!
Avoid foot traffic for the first two weeks
Fresh sod needs time to settle. Avoid walking on it for the first two weeks. This gives the grass a chance to root into the soil. Traffic can disrupt this process and harm your new lawn.
Keep pets and kids off the grass, too. You want it healthy and ready for playtime later. After two weeks, you can walk on it again without worry. Next, let’s talk about watering techniques for your new sod!
Conclusion
Installing fresh sod can make your lawn look amazing. Follow this guide to do it right. Start by preparing the soil and choosing the best grass type. Lay the sod in a staggered pattern, then water it well.
Soon, you will have a beautiful green space to enjoy!


Leave a Reply