Installing new flooring can transform the look and feel of your home, adding warmth, elegance, and value. One of the most popular choices for homeowners today is engineered hardwood flooring, known for its beauty, durability, and ease of installation. Unlike traditional solid hardwood, engineered hardwood is constructed with a real wood veneer on top of a high-density plywood or fiberboard core, offering greater stability and moisture resistance, notes Rent Easy Property Management Services.
Whether you’re updating your living room, bedroom, or kitchen, learning how to install engineered hardwood flooring can save you money on professional installation costs while giving you the satisfaction of a DIY project. In this comprehensive guide, we’ll take you through each step of the installation process, from preparing your space and choosing the right tools to laying down the boards and adding the finishing touches.
Why Choose Engineered Hardwood Flooring?
Before diving into the installation process, it’s essential to understand why engineered hardwood flooring is such a popular choice for homeowners:
- Durability and Stability
Engineered hardwood is designed with multiple layers of wood, making it more resistant to moisture, temperature fluctuations, and warping compared to solid hardwood. This makes it ideal for basements, kitchens, and other areas prone to humidity. - Versatility and Style
Engineered hardwood comes in a variety of wood species, finishes, and plank widths, allowing you to achieve the look of solid hardwood while enjoying enhanced stability. It complements various interior design styles, from traditional to modern. - Ease of Installation
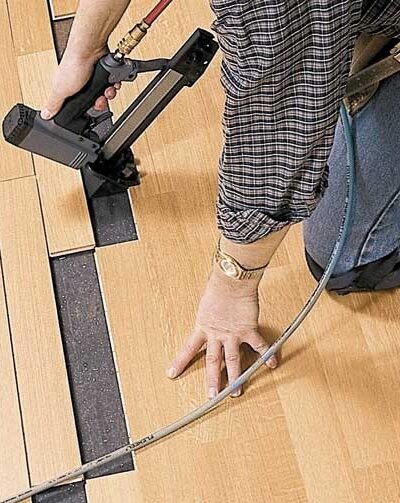
Engineered hardwood offers versatile installation methods, including floating, glue-down, and nail-down options. The floating click-lock system is particularly beginner-friendly, making it a great choice for DIY enthusiasts. - Cost-Effective and Long-Lasting
Engineered hardwood is more affordable than solid hardwood while offering comparable beauty and durability. It can be sanded and refinished once or twice, extending its lifespan.
Tools and Materials Needed for Installation
Before you start installing your engineered hardwood flooring, gather the following tools and materials:
Tools Required:
- Measuring tape and chalk line
- Circular saw or miter saw
- Rubber mallet
- Flooring spacers
- Pry bar
- Tapping block
- Utility knife
- Hammer and finishing nails
- Level and carpenter’s square
- Knee pads (for comfort)
Materials Needed:
- Engineered hardwood flooring planks
- Underlayment (foam or cork, depending on manufacturer’s recommendations)
- Moisture barrier (for concrete subfloors)
- Transition strips and baseboards
- Wood glue (for tongue-and-groove installations)
- Adhesive (for glue-down installations)
- Floor cleaner and microfiber mop (for cleaning)
Step 1: Prepare the Subfloor
Proper preparation of the subfloor is crucial for a successful installation. The subfloor must be clean, dry, level, and structurally sound to ensure a smooth and durable finish.
1. Check Subfloor Type and Condition:
- Concrete Subfloor:Ensure it is clean, dry, and level. Use a moisture barrier to prevent moisture damage.
- Plywood Subfloor:Check for loose nails or screws and secure them. Sand down any uneven areas.
- Existing Flooring:Remove old carpet, vinyl, or laminate flooring. Engineered hardwood can be installed over existing tile or wood flooring if it’s level and in good condition.
2. Clean and Level the Subfloor:
- Sweep and vacuum the subfloor to remove dirt and debris.
- Use a leveling compound to fill in low spots or sand down high areas for a flat surface.
- Ensure the subfloor is level within 1/8 inch over a 6-foot span.
3. Acclimate the Flooring Planks:
- Allow the engineered hardwood planks to acclimate in the installation room for at least 48 to 72 hours. This helps the wood adjust to the room’s temperature and humidity, preventing warping or buckling.
Step 2: Lay the Underlayment and Moisture Barrier
Underlayment provides cushioning, sound insulation, and moisture protection, ensuring a long-lasting installation.
1. Choose the Right Underlayment:
- Foam Underlayment:Ideal for floating installations over plywood subfloors. Provides cushioning and sound insulation.
- Cork Underlayment:Offers superior sound absorption and is eco-friendly.
- Moisture Barrier:Required for concrete subfloors to protect against moisture and humidity.
2. Install the Underlayment and Moisture Barrier:
- Roll out the underlayment or moisture barrier in the same direction as the flooring planks.
- Allow the edges to overlap by a few inches and secure them with adhesive tape.
- Avoid overlapping underlayment seams to prevent uneven surfaces.
Step 3: Plan Your Layout and Start the Installation
Planning your layout ensures an even and visually appealing floor pattern.
1. Plan the Layout:
- Measure the room’s length and width to calculate the number of planks needed.
- Plan the layout to avoid narrow planks (less than 2 inches) on the final row. Adjust the starting row if necessary.
- Stagger the end joints by at least 6 inches to create a natural, random pattern.
2. Establish a Starting Point:
- Begin along the longest, straightest wall, preferably parallel to a window to enhance the room’s appearance.
- Use a chalk line to mark a straight guideline for the first row.
Step 4: Install the First Row
The first row sets the foundation for the rest of the floor, so ensure it is straight and secure.
1. Lay the First Row:
- Place spacers between the wall and the planks to create a 1/4-inch expansion gap, allowing the wood to expand and contract.
- Connect the planks using the tongue-and-groove or click-lock system. Ensure the tongue side faces the wall.
2. Secure the First Row:
- For floating floors, lock the planks together without glue or nails.
- For glue-down installations, apply adhesive to the subfloor and press the planks firmly.
- For nail-down installations, secure the planks with finishing nails along the tongue edge.
Step 5: Continue Laying the Planks
Continue the installation row by row, maintaining the staggered pattern for a natural look.
1. Stagger the Joints:
- Cut the starting plank of each new row to ensure the end joints are staggered by at least 6 inches.
- Use a tapping block and rubber mallet to lock the planks securely.
2. Cut Planks to Fit:
- Use a circular saw or miter saw to cut planks to fit around corners, doorways, and other obstacles.
- For the final row, measure and cut the planks lengthwise to fit against the wall, leaving the expansion gap.
Step 6: Finish with Transition Strips and Baseboards
Complete the installation with finishing touches that provide a polished look and protect the edges.
1. Install Transition Strips:
- Use transition strips to bridge the gap between different types of flooring (e.g., hardwood to tile or carpet).
- Secure the strips with adhesive or screws for a seamless transition.
2. Attach Baseboards and Moldings:
- Remove the spacers and install baseboards to cover the expansion gap along the walls.
- Use finishing nails and fill nail holes with wood putty for a clean finish.
Step 7: Clean and Maintain Your New Floor
Proper cleaning and maintenance ensure the longevity and beauty of your new engineered hardwood floor.
1. Initial Cleaning:
- Sweep or vacuum the floor to remove dust and debris.
- Wipe the floor with a microfiber mop and a hardwood floor cleaner suitable for engineered wood.
2. Maintenance Tips:
- Place area rugs or mats in high-traffic areas to reduce wear and tear.
- Use felt pads under furniture to prevent scratches.
- Avoid using water or steam mops, as excessive moisture can damage the floor.
Enjoying Your New Engineered Hardwood Floor
Installing engineered hardwood flooring is a rewarding DIY project that adds style, value, and warmth to your home. By following these step-by-step instructions, you can achieve a professional-quality installation that enhances your living space for years to come.
With its durability, elegance, and ease of maintenance, engineered hardwood flooring is an excellent investment that brings beauty and functionality to any room. Ready to transform your space? Gather your tools, plan your layout, and start installing your new engineered hardwood floor today.


Leave a Reply