
Did you know that you can turn those lovely dishes into some stunning visuals? Well, you can actually use food photographs to keep or showcase some of your best recipes. You could even build a following or business online.
But you don’t need to be a chef or a pro photographer to take some stunning shots! You just need the right techniques, tools and some creativity. Here’s your guide on how to capture your recipes in ways that make taste almost jump off the screen.
Use Natural Light to Highlight Freshness and Flavor
For starters, the foundation of every great food photo starts with proper lighting. This is where natural lighting comes in handy. You can tap into that soft daylight to enhance the colors and textures of your food. You don’t want to create harsh shadows or distorting tones.
Now, you can simply get your setup near a large window during the morning or late afternoon for the best light.
If the sunlight is too strong, diffuse it using a white curtain or a thin bedsheet. Also, avoid mixing natural light with indoor bulbs, which can cause odd color casts and take away from the photo’s warmth. Once you start recognizing the power of light, you’ll realize your kitchen has its own mini photo studio waiting to be used.
Style Simply and Let the Dish Speak for Itself
Good styling doesn’t mean adding complexity. It means creating a scene that enhances the food while keeping things clean and intentional. So, start with simply choosing neutral plates, wooden boards, or soft-toned tablecloths. These ones will pretty much frame your recipe without drawing attention away. Then, add small details like fresh herbs, a drizzle of olive oil, or a vintage fork to create visual interest.
Color contrast is also a key piece of the puzzle. Bright green parsley on red pasta, or pale icing on a golden cake, instantly catches the eye. However, don’t overcrowd the plate. Give your dish room to breathe, and make sure it’s plated in a way that feels natural and authentic.
Keep in mind that styling is like seasoning. Just a little goes a long way, and the right balance will make your food look as delicious as it tastes.
Use Composition to Tell a More Compelling Story
Composition also shapes how the viewer experiences your photo. One of the simplest and most effective techniques is the rule of thirds. Imagine a tic-tac-toe grid across your image and position key elements along those lines or at their intersections. This creates balance and naturally draws the eye.
Also, shoot from different angles based on the structure of the dish, for example, flat-lay for pizza and salads, 45 degrees for cakes, and straight on for towering sandwiches or drinks. Don’t be afraid to zoom in to showcase textures like bubbling cheese or flaky crust.
This approach will guide your viewers through the plate and tell a fuller story of your recipe.
Elevate Your Shots with Professional Gear (Without Breaking the Bank)
While smartphones can create nice photos, you might want to buy a good DSLR or mirrorless camera for even better results. They allow you to control depth of field. You will also be able to adjust white balance manually, and capture higher detail in every shot. You can pair your camera with a versatile lens like a 50mm or a macro lens for beautiful close-ups.
That said, high-quality gear doesn’t always mean high cost. You can actually find top quality used cameras and lenses online. You’ll save a lot plus you’ll get that professional look in your food photos. Over time, they can be especially valuable if you’re building a food blog, cookbook, or brand presence online.
Let the Background Support, Not Steal the Spotlight
It’s also wise to stick with simple textures and colors. Think of aged wood, slate tiles, or linen napkins that add dimension without distracting the eye.
Generally speaking, avoid patterns or bright colors that clash with your food. Your goal is to create harmony.
You can go for reusable surfaces like vinyl backdrops or foam boards painted to mimic marble or concrete. These are some good inexpensive and lightweight alternatives to heavy props. Keep the space around your dish clean and intentional. Every element in the frame should serve a purpose. A subtle backdrop creates contrast, brings out colors, and lets the dish remain the center of attention.
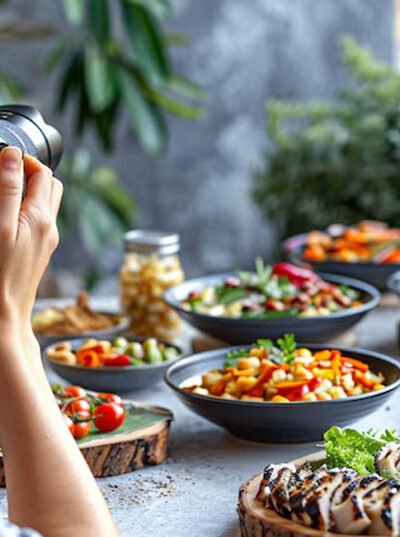
Bring in the Human Element for Warmth and Relatability
Adding a human touch to your food photos is another simple hack to create a connection with your audience. In this regard you can add something like a hand holding a fork, pouring syrup, or slicing into a pie. These will make your photo feel like a moment captured in real life rather than just depicting a plate on a table. It becomes an experience shared.
You can also include cooking tools or ingredients in action, like flour being dusted or soup being stirred. These visual cues tell a story about preparation, not just presentation. Keep in mind that people naturally respond to authenticity and this type of storytelling turns a static image into a living memory.
Edit with Care to Preserve Realism
Last but not least, editing is the final polish you should use to make your recipes look flick. But it should never distort reality. You can do things like tweaking brightness, contrast, and white balance. You could also enhance shadows and highlights to add depth, but avoid going overboard. You can also boost saturation slightly to make ingredients pop, especially greens, reds, and warm tones.
Tip: You can save your editing presets to maintain a consistent style across your photos. This kind of consistency builds a visual identity. It helps viewers to recognize your work over time
Wrapping up
In a nutshell, you can use photos to capture what you cook in the kitchen. That said, you need the right camera and some hacks to capture those photos that evoke emotions. So next time you whip up your favorite recipe, take a moment. Look at the color, the texture, the shape. Grab your camera and share that creation with the world. You’ll be amazed how much beauty is already simmering in your everyday kitchen.


Leave a Reply