
 I used to rush through my morning routine just to get out of my bathroom faster. The space was functional, sure, but it felt cramped, dated, and honestly a bit depressing. Then three months ago, I finally renovated both my toilets, and wow – what a difference. My bathroom has become this calm, spa-like space where I actually enjoy spending time. Here’s how I made it happen without breaking the bank.
Why I Finally Decided to Renovate
For years, I told myself the bathroom was “fine.” The tiles were clean, everything worked, so why spend money on it? But living with cracked grout, outdated fixtures, and that weird water stain that never quite went away was draining in ways I didn’t fully realize.
The turning point came when my sister visited from Melbourne. She walked into my bathroom and immediately said, “You really need to fix this up.” Sometimes you need an outsider’s perspective to see what you’ve been ignoring. That comment stuck with me, and within a week, I was calling contractors for quotes.
My budget was realistic from the start – $5,000 per bathroom. I wasn’t looking for luxury, just a clean, modern space that felt good to use every day. Turns out, that’s totally achievable with smart planning.
Finding Inspiration That Actually Fit My Space
I spent way too much time on Pinterest looking at gorgeous bathrooms that were twice the size of mine. Eventually, I realized I needed to focus on what works in a typical HDB toilet – which is usually pretty compact.
The Scandinavian minimalist look caught my attention. Clean lines, neutral colors, lots of white to make the space feel bigger. Nothing too fussy or trendy that would look dated in five years. I wanted timeless and calming.
I created a simple mood board with bathroom photos that matched my actual square footage. This helped me communicate clearly with contractors about what I wanted. No confusion, no disappointment when reality didn’t match magazine spreads of massive bathrooms.
Getting the Right Team
I got quotes from four different contractors. The pricing varied quite a bit – from $4,200 to $6,800 for the same basic scope of work. But price wasn’t everything.
The contractor I chose fell in the middle range but really understood what I was going for. They’d done dozens of HDB bathrooms and showed me photos of similar projects. Their HDB toilet renovation package included everything I needed: hacking out old tiles, proper waterproofing, new tiles, plumbing work, and installation of fixtures.
What sold me was their attention to detail during the quote process. They asked about my daily routine – who uses the bathroom when, what storage I needed, whether I preferred baths or showers. These questions showed they cared about creating a functional space, not just installing tiles and calling it done.
Smart Choices That Maximized My Budget
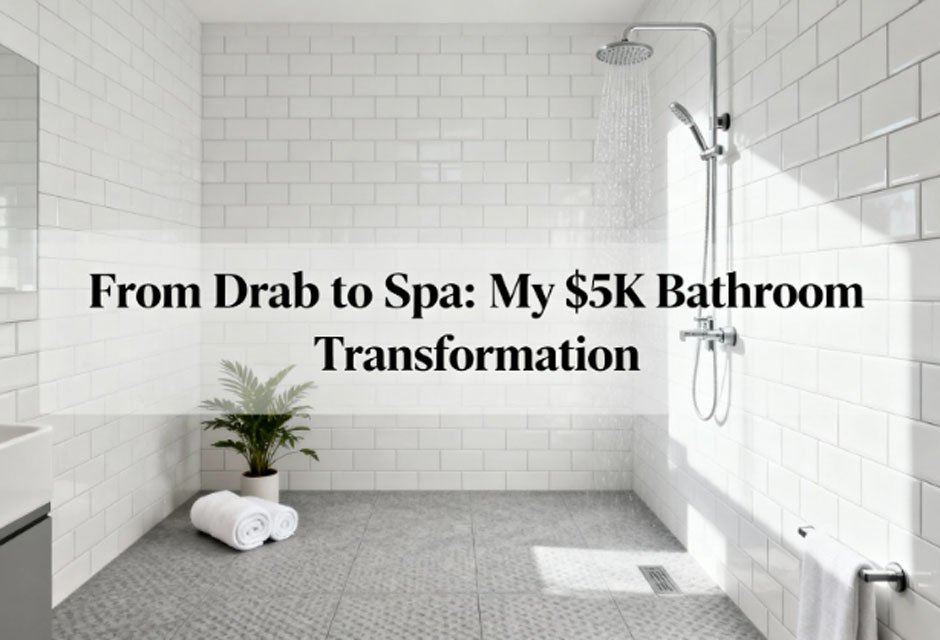
We went with mid-range ceramic tiles instead of premium imported ones. Honestly, once they’re installed and grouted properly, the difference is barely noticeable. I chose a classic white subway tile for walls – it’s timeless, makes the space feel bigger, and cost only $3 per square foot.
For flooring, I picked a light grey tile with subtle texture. The texture matters more than people realize – smooth tiles get slippery when wet, which is dangerous. Bathroom safety is something many people overlook until someone slips. This textured option looks sophisticated and adds safety without costing extra.
The vanity was a splurge area for me, but I stayed smart about it. Instead of a custom-built vanity, I found a pre-made one that fit my space perfectly. Added a decent mirror with built-in LED lighting, and suddenly my bathroom looked way more expensive than it was.
I kept the shower simple – wall-mounted fixtures rather than a fancy rain shower system. The money I saved went toward really good waterproofing, which my contractor emphasized was crucial. He applied two coats of cementitious waterproofing following HDB standards, with a two-year warranty included.
The Features I Absolutely Love
Installing a rainfall showerhead was the best $180 I spent. It’s not some elaborate system, just a good quality wall-mounted rain shower. Every morning feels like a mini spa experience now. Such a simple upgrade but it genuinely improved my quality of life.
We added a recessed shelf in the shower area. Instead of having bottles cluttering the floor or hanging organizers everywhere, everything has a proper spot. The shelf was built during the tiling phase, so it looks integrated and clean rather than like an afterthought.
The lighting transformation surprised me most. We installed waterproof LED downlights plus the mirror lighting. Good lighting makes everything look cleaner and helps with makeup and grooming. My old bathroom had one sad ceiling light – no wonder it always felt gloomy.
A small exhaust fan upgrade made a bigger difference than expected. My old fan was weak and noisy. The new one is quiet and actually removes moisture efficiently. Proper bathroom ventilation prevents mold growth and keeps the air fresh. No more foggy mirrors or that musty smell that used to linger.
What Made the Process Smooth
The entire renovation took about two weeks per bathroom. We did them one at a time so we always had a functioning toilet, which made life way easier. I stayed with my parents for the first renovation week just to avoid the dust and noise, then came back when they moved to the second bathroom.
My contractor handled the HDB permit application. According to HDB renovation guidelines, you need approval before starting major bathroom work. Having the contractor manage this saved me hours of bureaucracy and ensured everything was compliant.
We made all material selections before work started. I’d visited the tile showroom, picked my vanity, and chosen all fixtures in advance. This meant no delays waiting for decisions, and the contractor could order everything upfront.
Pleasant Surprises During Renovation
The hacking revealed that my bathroom floor wasn’t properly waterproofed originally – there were signs of water seepage that I’d never noticed. My contractor fixed this properly, which probably prevented major water damage issues down the line. Sometimes renovations catch problems before they become disasters.
My tiles were delivered exactly on time and matched the samples perfectly. The installation was meticulous – straight grout lines, clean edges, everything lined up properly. You don’t always get this level of craftsmanship, so I felt lucky.
The project finished three days ahead of schedule. My contractor mentioned that having clear decisions and all materials ready made their job much smoother. Good planning benefits everyone.
Three Months Later: Living With the Results
I genuinely look forward to my morning shower now. That sounds silly, but it’s real. Starting the day in a space that feels clean, calm, and well-designed sets a better tone for everything else.
The bathroom is way easier to clean. Good quality grout and proper sealing means nothing stains or gets grimy. A quick wipe-down keeps everything looking fresh. My old bathroom required serious scrubbing to look decent.
Friends who visit always comment on the bathroom. Several have asked for my contractor’s details because they want the same transformation. But beyond impressing guests, I just feel better in my own home knowing every space is pleasant to use.
The investment was absolutely worth it. For $5,000, I got a bathroom that feels like it belongs in a newer, nicer home. It even increased my property value, though that wasn’t really the point. The daily quality-of-life improvement is what matters most.
Advice for Your Bathroom Renovation
Don’t underestimate how much a bathroom renovation can improve your daily life. We spend so much time in these spaces – they deserve to feel good, not just functional.
Set a realistic budget and stick to it by making smart trade-offs. Splurge on things you’ll interact with daily (showerhead, lighting, fixtures) and save on things that are just decorative. Beautiful tiles matter less than good waterproofing, trust me.
Choose a contractor with specific HDB bathroom experience. Small spaces require different approaches than large ones. You want someone who knows how to maximize limited square footage and understands HDB regulations.
Plan everything before demolition starts. Walking into showrooms during renovation creates stress and delays. Do your homework upfront, make decisions calmly, and then let the contractor execute your vision.
Think about maintenance during design. That gorgeous dark grout might look dramatic, but will you hate cleaning it every week? Light colors, quality materials, and simple designs stay looking good with minimal effort.
The Bottom Line
My bathroom renovation turned out even better than I imagined. The space feels bigger, brighter, and so much more pleasant. Every time I walk in there, I’m glad I finally stopped putting it off.
You don’t need a huge budget to create a bathroom you love. You need clear vision, smart choices, and a good contractor who understands what you’re trying to achieve. The combination of those three things can transform even the smallest HDB toilet into something special.
If you’re on the fence about renovating your bathroom, consider how many years you’ll spend using that space. Even a modest investment pays dividends in daily comfort and enjoyment. Three months in, I’m still happy every single morning – and that’s worth every dollar I spent.


Leave a Reply