Mason Jar Breakfast

Not Your Grandma's Mason Jar Anymore!

  • Home
  • Recipes
    • Mason Jar Breakfast
    • Mason Jar Lunch
    • Mason Jar Dinner
    • Mason Jar Dessert
  • Crafts
  • Décor
  • Gifts
  • Beauty
  • About
  • Shop
  • Others
    • Auto
    • Business
    • Fashion
    • Food & Beverage
    • Health
    • Home Improvement
    • Immigration & Investment
    • Lifestyle
    • SEO Digital
    • Tech
    • Travel
From Dated to Dreamy: How to Refresh a 90s Bathroom

From Dated to Dreamy: How to Refresh a 90s Bathroom

Home Improvement Leave a comment

If your bathroom still looks like it belongs in a 1997 home catalog, you’re not alone. Lots of homes built or remodeled in the ’90s are showing their age. Think bulky tubs, busy tile patterns, brass everything, and lighting that doesn’t do anyone any favors. The good news? You don’t need to start from scratch to bring your bathroom into the present. A few key updates can go a long way in giving your space a fresh, clean, and modern look.

Let’s walk through some simple, smart ways to upgrade that tired 90s bathroom—without going overboard or blowing your budget.

1. Rethink the Layout and Functionality

One of the biggest issues with 90s bathrooms is how the space is used. They often have oversized bathtubs no one really uses, showers that feel boxed in, or vanities that take up more room than they need to. The layout might not work well anymore, especially if your household has grown or your needs have changed.

If you’re trying to open things up and make the bathroom more functional, a great place to start is with a tub to shower conversion. Swapping out a big, unused tub for a modern shower can free up space and make the room feel less cramped. It’s also a practical choice if you’re looking for easier maintenance or quicker daily use.

This kind of change doesn’t have to take weeks, either. With the right team, it’s possible to get a clean, stylish new shower installed in just a day or two. Whether you’re after a sleek walk-in or something with built-in seating and shelves, a tub-to-shower swap can be one of the most noticeable and helpful changes you make.

2. Swap Out the Surfaces

Surfaces make a huge difference in how a bathroom looks and feels. Many 90s bathrooms are filled with outdated tile patterns, laminate countertops, and floors that haven’t aged well. If yours still has that pink-and-gray checkerboard tile or faux-marble counters, it’s time for a change.

Start with the walls. Replacing tile with something simple like white subway tile or a large-format neutral tile can instantly modernize the space. If you want to skip tile altogether, there are waterproof wall panels that look sleek and are easy to keep clean.

For counters, quartz or solid surface materials are low-maintenance and offer a clean, modern finish. And when it comes to flooring, luxury vinyl or porcelain tile options today are much better looking and more durable than what you’d find in a 90s bathroom. These upgrades don’t just improve how your bathroom looks—they also make it easier to clean and more enjoyable to use every day.

3. Modernize the Fixtures and Finishes

The little details are often what scream “dated.” Polished brass everything was huge in the 90s, but it tends to make a space feel old now. Swapping out your faucet, cabinet hardware, towel bars, and light fixtures can make a surprising difference—and it’s a fairly easy weekend project.

Matte black, brushed nickel, and warm brass are all popular finish choices today. They’re simple, clean, and go with almost any color scheme. You don’t have to match everything perfectly, either. Mixing metals (for example, matte black with brushed gold) can give your bathroom a more custom feel.

Don’t forget the lighting. Those strip lights with round bulbs over the mirror were common in the 90s but feel harsh and outdated now. Consider installing a more modern vanity light or even a couple of sconces on either side of your mirror. Better lighting can change the whole feel of the space and even help you get ready in the morning with less frustration.

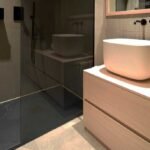
4. Update the Vanity Area

In a lot of 90s bathrooms, the vanity is oversized and boxy. You might have a double sink setup taking up the whole wall or a vanity that sits flush with the floor and offers little storage. This setup often wastes space and feels heavy in smaller bathrooms.

Updating the vanity area can give your bathroom a cleaner, more organized look. Floating vanities are a popular choice because they open up the floor visually, making the room feel larger. If you prefer a traditional cabinet, choose something with drawers and smart storage to keep clutter off the counters.

And while you’re at it, replace that big, frameless mirror with something more stylish. Framed mirrors, round mirrors, or backlit mirrors can instantly make the space feel more modern. Pair it with a sleek sink and modern faucet, and your vanity area will feel brand new even if the plumbing stays where it is.

5. Add Personal Touches

Once you’ve tackled the bigger updates, it’s time to bring in the things that make the bathroom feel like yours. This is where you can play with color, texture, and personality without committing to anything permanent.

Switch out old towels for new ones in calming tones or bold colors—whatever fits your style. Add a piece of art or a small shelf for decorative items. A plant or two (real or faux) can bring life into the space and soften the look. Even a new bath mat and shower curtain can make everything feel fresh again.

These finishing touches don’t have to be expensive or complicated. They just help turn your upgraded bathroom into a space that feels comfortable and current.

Refreshing a 90s bathroom doesn’t mean you need to tear the whole thing apart. Sometimes, all it takes is a few focused changes to get the clean, modern look you’re after. Start with what bugs you the most—maybe it’s the clunky tub, the yellowed counters, or the old light fixtures—and work from there.

Smart updates like a modern shower, luxury finishes, and better storage can completely change the way your bathroom feels and functions. And with so many quick-install options available today, the whole process doesn’t have to be a long, stressful project.

Take it one step at a time. Before you know it, that dated bathroom will feel like a brand-new space you actually enjoy using every day.


Related Posts

  • Easy Bathroom Cleaning Hacks You Need to Know
    Quick and Easy Bathroom Cleaning Hacks You Need to Know

    Sparkling bathrooms do not require hours of scrubbing and effort. A few innovative methods and…

  • Water-Resistant Bathroom Vanity Units: Why Is It The Best Option for High-Moisture Areas
    Water-Resistant Bathroom Vanity Units: Why Is It The Best Option for High-Moisture Areas

    Does your bathroom reflect your desired style and elegance in your home’s interior design? Excess…

  • Modern Home Decor and How To Incorporate Middle Eastern Elements Into Your Home
    Modern Home Decor and How To Incorporate Middle Eastern Elements Into Your Home

    Middle Eastern home decor embodies exclusivity, craftsmanship, heritage, and luxury. Even swanky modern homeowners can…

  • Reliable Residential Pest Control Services for Your Home
    Reliable Residential Pest Control Services for Your Home

    Are pesky pests turning your home into their playground? It’s time to show them the…

Filed Under: Home Improvement

Leave a Reply Cancel reply

Your email address will not be published. Required fields are marked *

Hi, I'm Yetta. I love having dance parties in the kitchen with my family, traveling, and Mason jar creations.

Follow on Facebook Follow on Pinterest Follow on Twitter Follow on Instagram

Recent Posts

Avoiding Common Mistakes During Estate Administration
Women In Recovery Often Face Different Pressures, Here Are Five That Shape The Journey
What Are Some Menu Staples of American Grills?
The Rider’s Roadmap: Planning Motorcycle Transport for Your Next Big Move For many riders, a motorcycle is more than just a vehicle. It represents freedom, independence, and countless miles of adventure. When it comes time to move to a new city or region, however, transporting a motorcycle requires careful planning. Whether relocating for work, education, or a lifestyle change, ensuring your bike arrives safely at its new destination is an important part of the process. Planning motorcycle transport properly helps protect your bike, reduce stress during the move, and ensure that once you arrive, your motorcycle is ready to hit the road again. Decide Whether to Ride or Ship Your Motorcycle The first step in planning motorcycle transport is deciding whether to ride the bike to your new location or arrange transport. While riding may seem like the most natural option, long-distance journeys can sometimes be impractical. Factors such as the distance, time constraints, weather conditions, and the amount of luggage you need to carry can all influence this decision. For riders relocating across the country or managing a busy move, shipping the motorcycle can often be the safer and more convenient choice. Transporting the bike separately allows riders to travel more comfortably while ensuring the motorcycle is handled with care. Explore Different Motorcycle Transport Options Motorcycles can be transported using several different methods. Each option has advantages depending on your situation. One option is transporting the motorcycle yourself using a van or trailer. This approach provides control over the process but requires the correct equipment and knowledge of how to secure the bike safely. Another option is using professional motorcycle transport services. These companies specialise in vehicle delivery and typically use vans or trailers designed specifically for motorcycles. Many riders prefer this approach because it reduces the risks associated with loading, securing, and transporting the bike themselves. Prepare Your Motorcycle for Transport Before your motorcycle is collected or loaded for transport, it is important to prepare it properly. Cleaning the bike is a good first step, as it makes it easier to identify any existing scratches or damage. It is also wise to remove any loose accessories such as tank bags, phone mounts, or detachable luggage. These items could move during transport and cause unnecessary damage. Taking photographs of the motorcycle before transport is also recommended. Documenting the bike’s condition provides reassurance and can be useful if any issues arise during delivery. Ensure the Motorcycle Is Properly Secured If you are transporting the motorcycle yourself, securing it correctly is essential. Motorcycles should be loaded carefully using a ramp and positioned in a stable location within the vehicle or trailer. Strong ratchet straps should then be used to secure the bike to fixed anchor points. Wheel chocks can help stabilise the front wheel and prevent movement during transit. Proper securing prevents the motorcycle from shifting or tipping while the transport vehicle is in motion. Choose a Reliable Transport Service When choosing a professional transport provider, reliability and experience should be key considerations. Motorcycle transport requires specialised handling, so it is important to work with companies that understand how to move bikes safely. Reading customer reviews, comparing quotes, and confirming insurance coverage can help ensure you select a trustworthy service. For riders relocating within the UK, services offering Cheshire motorcycle shipping can help connect owners with experienced transport providers who specialise in moving motorcycles securely between locations. Plan Delivery Logistics in Advance Motorcycle transport should be coordinated with the overall moving schedule. Planning delivery timing ensures that someone is available to receive the motorcycle once it arrives at the new location. It is also helpful to confirm whether the transport company offers door-to-door delivery or requires collection from a depot. Ensuring the delivery location is accessible for transport vehicles helps prevent delays. Careful planning allows the transport process to fit smoothly into the rest of your relocation. Protect Your Motorcycle Investment Motorcycles often represent both a financial investment and a personal passion. Taking steps to protect the bike during a move helps ensure it arrives in the same condition it left. This includes choosing a reputable transport service, preparing the motorcycle carefully, and confirming that the transport company provides insurance coverage during transit. These precautions help minimise risks and provide peace of mind throughout the moving process. Final Thoughts Relocating to a new place is an exciting chapter, and bringing your motorcycle along ensures the adventures can continue wherever you go. By planning transport carefully, riders can protect their bikes and avoid unnecessary complications during the move. From preparing the motorcycle to selecting the right transport provider, each step plays a role in ensuring a smooth transition. With the right planning in place, your motorcycle will be waiting for you at your new destination, ready for the next journey ahead.
5 Smart Ways to Keep Your Home Bar Setup Organised
how-japans-collectible-vending-trend-is-revolution-1

Recent Posts

  • Avoiding Common Mistakes During Estate Administration
  • Women In Recovery Often Face Different Pressures, Here Are Five That Shape The Journey
  • What Are Some Menu Staples of American Grills?
  • The Rider’s Roadmap: Planning Motorcycle Transport for Your Next Big Move
  • 5 Smart Ways to Keep Your Home Bar Setup Organised

categories

Copyright © 2026 · All rights reserved. Disclosure Policy. Contact Us: Kelli@masonjarbreakfast.com